Electronics 23
This tag groups hands-on electronics posts covering sensors, LEDs, displays, controllers, and the practical side of connecting Java software to real hardware.
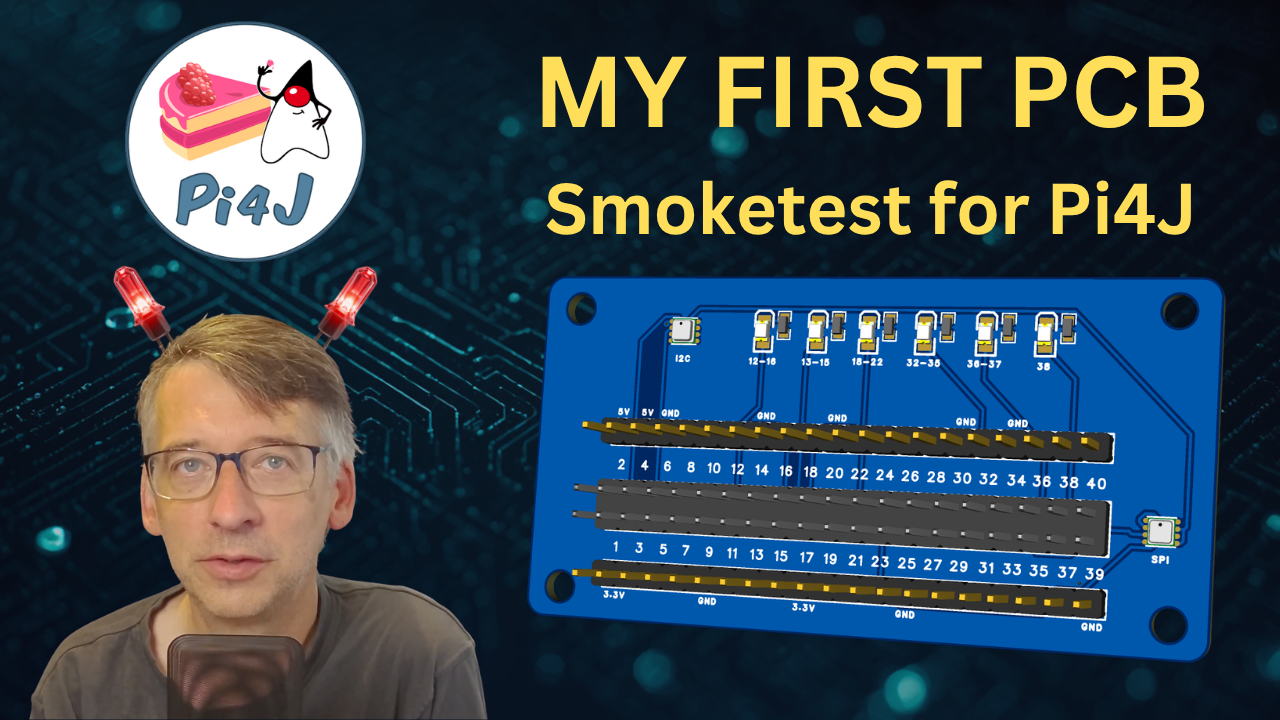
From breadboard chaos to a real PCB: designing the Pi4J smoke test board
Testing a Java I/O library properly means testing it on real hardware. No mocks, no stubs, just actual pins doing actual things. For Pi4J, that means running the smoke test: a …
Review of the Elecrow Raspberry Pi Pico Advanced Kit
People who follow me, know I’m a big fan of the Elecrow CrowPi , the little suitcase with a Raspberry Pi and a lot of electronic components included. I used it already a lot …
Controlling LED strips with Java
One of the most “fancy” electronic components is definitely a LED strip. It’s really cool to control a long strip of lights with only a few lines of code… But, …
Reading the temperature, humidity, and pressure from a BME280 Sensor with Java, Pi4J, I2C, SPI, and JBang
To make it as easy as possible to get started with Java on the Raspberry Pi to interact with electronic components, I started a new section on the Pi4J website with JBang examples …
Using the Raspberry Pi Autofocus Camera Module 3 as HDMI camera
More than two years ago, I blogged about the use of the Raspberry Pi as an HDMI camera for the ATEM Mini . Although I have been using such a camera since then as my main Zoom …
HiveMQ Cloud, part 4 - Sending sensor data from Raspberry Pi Pico W to HiveMQ Cloud
Exactly one year ago, in December 2021, I published three articles of MQTT messaging with Raspberry Pi, Raspberry Pi Pico and HiveMQ Cloud . On June 30th of 2022, Raspberry Pi …
Blink a LED and read a button state with Vaadin, Spring and Pi4J on a Raspberry Pi
As I’m becoming a senior developer in terms of age, I’ve transitioned from one language to another. One of my main interests has always been clean, easy-to-understand …
Using a Raspberry Pi as HDMI camera
TL;DR; Yes, you can build your own Raspberry Pi HQ camera to use as an HDMI source for the ATEM Mini Looking for an affordable camera with HDMI output? Build one yourself with a …
HiveMQ Cloud, part 3 - Sending sensor data from Raspberry Pi Pico to HiveMQ Cloud
In the previous two posts in this series, we used Java on the Raspberry Pi mini-computer to send sensor data to HiveMQ Cloud, and visualize it on a dashboard.
Using Pi4j (V1) on the Raspberry Pi 4
A topic which comes up from time to time in questions related to Java and the Raspberry Pi, is the support of the 4th version of this board in combination with Pi4J, “the …
Drumbooth controller with Raspberry Pi, JavaFX, and Arduino
Based on multiple examples from my book “Getting started with Java on Raspberry Pi” , I created a touchscreen controller for the drum booth of my son. Combined with …
Controlling a LED number display with JavaFX and Python on Raspberry Pi
In my book I explain the use of bits and bytes by using a shift register SN74HC595 IC and 5101AS LED number display .
Calculating resistor value with a JavaFX application
Using the Java library I created (see previous post ), it was a piece of cake to create a JavaFX UI on top of it!
Resistor color codes and calculations as a Java Maven library
Next step in my book progress, is getting more into the details of hardware components. And as always starting with the smallest most-used ones: resistors! To be able to fully …
Raspberry Pi history, versions, pins and headers as a Java Maven library
The best way to understand and learn something new, is to document it yourself. That’s what I’m doing in every step for my book-in-progress. And to fully get the …
Controlling Arduino with Mosquitto and JavaFX on Raspberry Pi
One of the example applications in my book “Getting started with Java on the Raspberry Pi” combines a JavaFX application with Mosquitto on the Raspberry Pi to control a …
LED number display JavaFX library published on Maven
My very first open source JavaFX library is now available in the Maven repository! A small step for mankind, one giant leap for myself ;-)
DIY Arduino MIDI instrument
And another summer project got finished… ;-) My sons drum corps teacher triggered me to build an Arduino Midi controller so he could practice his rhythm skills.
Clean Raspberry Pi GPIO testing with the Breadboard Pi Bridge
Some time ago I ordered a “Breadboard Pi Bridge - Pi Ports to Breadboard in Numerical Order” and reworked my Pi test setup from the previous blogs. And it looks really …
Pi4J to easily work with the hardware of a Raspberry Pi with Java
What is Pi4J See https://www.pi4j.com/1.2/index.html This project is intended to provide a friendly object-oriented I/O API and implementation libraries for Java Programmers to …