HiveMQ Cloud, part 4 - Sending sensor data from Raspberry Pi Pico W to HiveMQ Cloud
Exactly one year ago, in December 2021, I published three articles of MQTT messaging with Raspberry Pi, Raspberry Pi Pico and HiveMQ Cloud. On June 30th of 2022, Raspberry Pi released a new product, that is the subject of this post: the Pico W. Yes, a new version of the original Pico, but with Wi-Fi. The new board is for sale for 6$, compared to the 4$ of the original Pico.
In this post, we will rework the third project of the posts from December last year, where data was sent to HiveMQ Cloud using a Pico, separate Wi-Fi module and distance sensor. We can simplify that project now by using the new Pico W, removing the need for that separate Wi-Fi module.
The sources of this project and the previous three parts are available on GitHub.
About HiveMQ Cloud
HiveMQ Cloud is an online MQTT-compatible service which is totally free up to 100 devices! Even for the most enthusiastic maker, that’s a lot of microcontrollers or computers!
On the HiveMQ Blog an article by Kudzai Manditereza was published that also describes how to use the Pico W.
About the Raspberry Pi Pico W
The new Pico W has exactly the same form-factor as the original Pico. There is a minor change in the wiring as the connection of the on-board LED has changed. You should be able to swap to the new version in most existing projects, without any problems.
Wiring
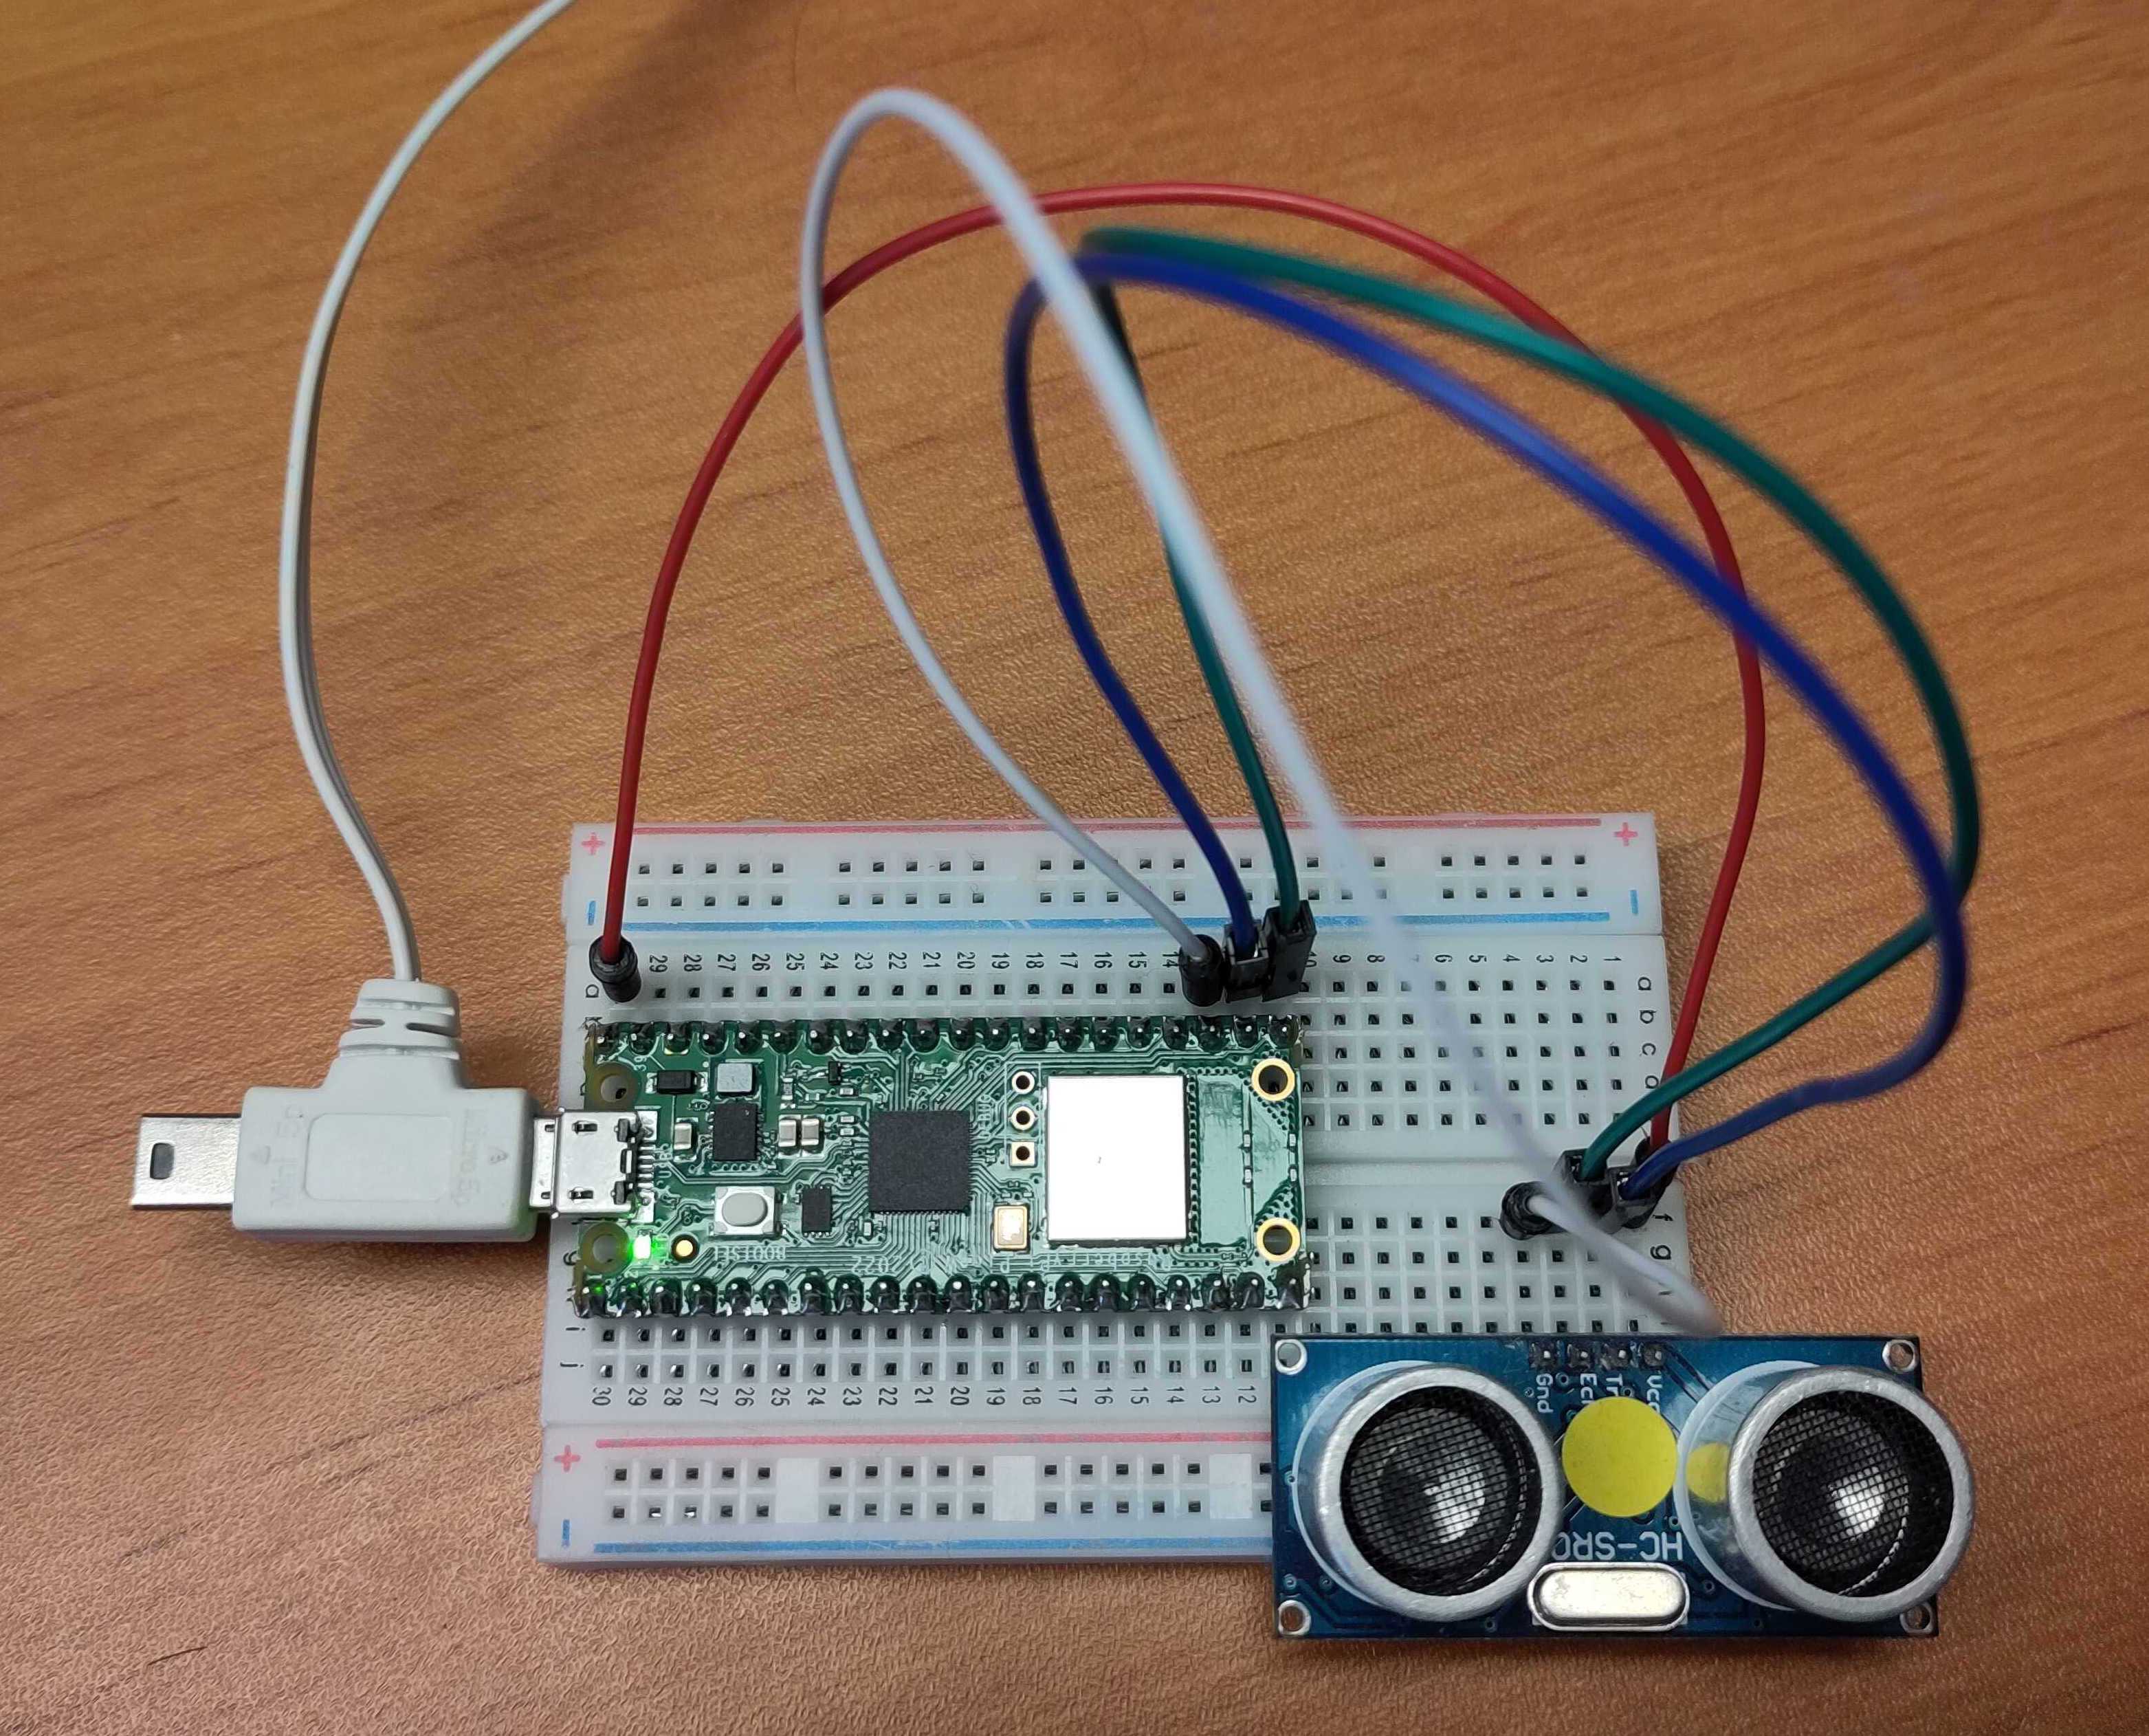
Breadboard setup
Take a breadboard and some wires to create this small test setup. Compared to the previous post with the Pico and an additional Adafruit AirLift Wi-Fi, the setup is now a lot simpler.
The only component to be connected is the distance sensor.
Distance sensor
Only 4 wires are needed, for simplicity connected to the same pins as used in the previous post, but of course you are free to use other ones, as long as you use the correct numbers in your code.
| Pico | HC-SR04 |
|---|---|
| VBUS | Vcc |
| GND | GND |
| GP16 | ECHO |
| GP17 | TRIGGER |
MicroPython project
In the previous project with the Pico, CircuitPython was used to code the program. Unfortunately, when I started with this project to connect Pico W to HiveMQ Cloud, CircuitPython was not yet available with support for the WiFi module of the Pico W. That ticket on GitHub now seems to be closed and resolved, so I leave it up to you to try out. In this post we will be using MicroPython.
“MicroPython is a lean and efficient implementation of the Python 3 programming language that includes a small subset of the Python standard library and is optimised to run on microcontrollers and in constrained environments.”.
To install MicroPython on the Pico W, follow this step-by-step provided by Raspberry Pi.
Setting up a secure connection - as required by HiveMQ Cloud - turned out to be an additional challenge. In the end, as most of the times, it was just a matter of finding the right library and settings. Luckily I got the support of a few members of the HiveMQ forum as you can see in this thread.
Warning! If you are using an Apple computer with macOS Ventura, there could be a problem to connect to the Pico. See this blog post for more info.
Install Thonny IDE on Mac
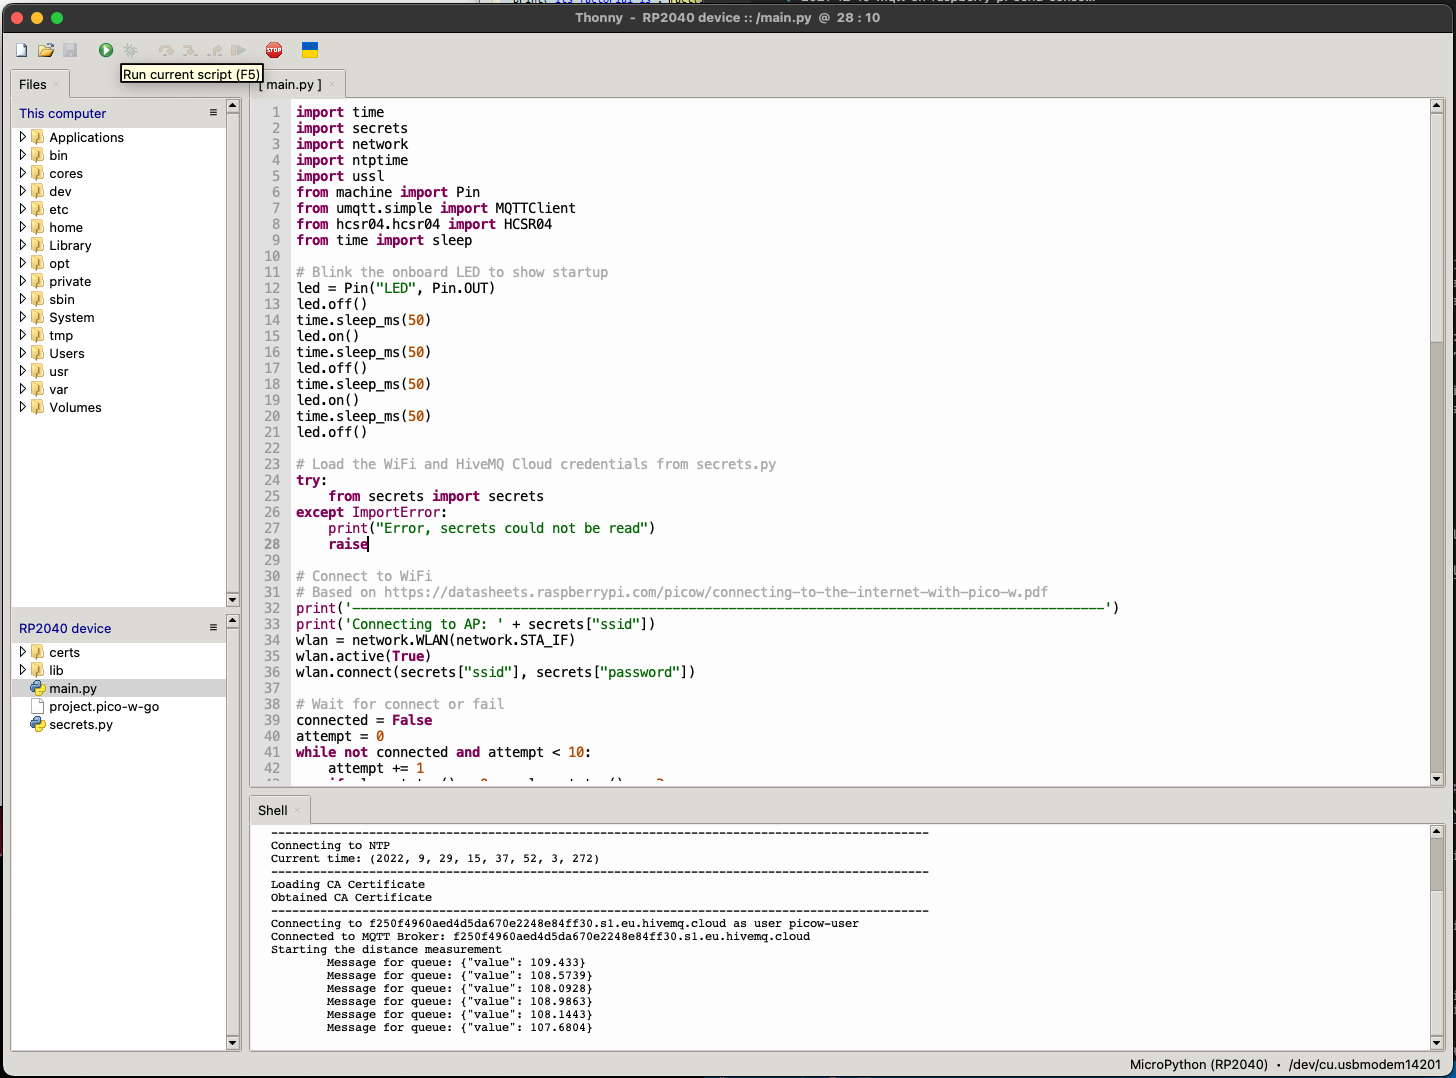
I tried several IDEs to program the Pico W, but found out that Thonny is the best option. It is available for Windows, Mac, and Linux. On macOS you can easily install with brew install --cask thonny. Once installed, make sure to open “View > Files”, and select your board “MicroPython (RP2040)” in the lower right corner of the screen as you can see in the screenshot.
Install the libraries
Our application will use two libraries to minimize the code we need to write ourselves.
The first one gives us an MQTTClient. Copy the code from the file you can find on GitHub in the MicroPython project, create a new file in Thonny and save it to the Pico W in the directory /lib/umqtt/ as file simple.py.
Another approach to install a library, provided by MicroPython, is using the terminal in Thonny and run these two commands:
>>> import upip
>>> upip.install('umqtt.simple')
Installing to: /lib/
Warning: micropython.org SSL certificate is not validated
Installing umqtt.simple 1.3.4 from https://micropython.org/pi/umqtt.simple/umqtt.simple-1.3.4.tar.gz
The second library helps us with the distance measurements with the HC-SR04 sensor. Again, copy this code from GitHub from a project by rsc1975 (Roberto), create a new file in Thonny and save it to the Pico W in the directory /lib/hcsr04/ as file hcsr04.py.
Secrets
Create a file in the root of the Pico W called secrets.py with the following content (this is the same file as used in the previous post with the Pico).
secrets = {
   'ssid' : 'WIFI_NETWORK_NAME',
   'password' : 'WIFI_PASSWORD',
   'timezone' : 'Europe/Brussels',
   'mqtt_username' : 'HIVEMQ_USERNAME',
   'mqtt_key' : 'HIVEMQ_PASSWORD',
   'broker' : 'YOUR_INSTANCE.hivemq.cloud',
   'port' : 8883
}
Project code
The final part is the actual application code. Create one extra file in the root of the Pico W called main.py with the following content:
import time
import secrets
import network
import ntptime
import ussl

from machine import Pin
from umqtt.simple import MQTTClient
from hcsr04.hcsr04 import HCSR04
from time import sleep

# Blink the onboard LED to show startup
led = Pin("LED", Pin.OUT)
led.off()
time.sleep_ms(50)
led.on()
time.sleep_ms(50)
led.off()
time.sleep_ms(50)
led.on()
time.sleep_ms(50)
led.off()

# Load the WiFi and HiveMQ Cloud credentials from secrets.py
try:
    from secrets import secrets
except ImportError:
    print("Error, secrets could not be read")
    raise

# Connect to WiFi
# Based on https://datasheets.raspberrypi.com/picow/connecting-to-the-internet-with-pico-w.pdf
print('----------------------------------------------------------------------------------------------')
print('Connecting to AP: ' + secrets["ssid"])
wlan = network.WLAN(network.STA_IF)
wlan.active(True)
wlan.connect(secrets["ssid"], secrets["password"])

# Wait for WiFi connection or failure
connected = False
attempt = 0
while not connected and attempt < 10:
    attempt += 1
    if wlan.status() < 0 or wlan.status() >= 3:
        connected = True
    if not connected:
        print("Connection attempt failed: " + str(attempt))
        time.sleep(1)
    else:
        print("Connected on attempt: " + str(attempt))

if not connected or wlan.ifconfig()[0] == "0.0.0.0":
    # Blink LED to show there is a WiFi problem
    print("Bad WiFi connection: " + wlan.ifconfig()[0])
    while True:
        # Endless loop as we don't have a WiFi connection
        led.off()
        time.sleep_ms(150)
        led.on()
        time.sleep_ms(150)

# As we end up here, we now we have a WiFi connection
print("WiFi status: " + str(wlan.ifconfig()))
led.on()

# To validate certificates, a valid time is required
# NTP is used to get the correct time
# https://en.wikipedia.org/wiki/Network_Time_Protocol
print('----------------------------------------------------------------------------------------------')
print('Connecting to NTP')
ntptime.host = "de.pool.ntp.org"
ntptime.settime()
print('Current time: ' + str(time.localtime()))

# Load the certificate for secure connection to HiveMQ Cloud
print('----------------------------------------------------------------------------------------------')
print('Loading CA Certificate')
with open("/certs/hivemq-com-chain_2_only.der", 'rb') as f:
    cacert = f.read()
f.close()
print('Obtained CA Certificate')

# Connect to HiveMQ Cloud
# Based on https://www.tomshardware.com/how-to/send-and-receive-data-raspberry-pi-pico-w-mqtt
print('----------------------------------------------------------------------------------------------')
print("Connecting to " + secrets["broker"] + " as user " + secrets["mqtt_username"])

# Use sslparams as defined below for a secure connection
# sslparams = {'server_side': False,
#             'key': None,
#             'cert': None,
#             'cert_reqs': ussl.CERT_REQUIRED,
#             'cadata': cacert,
#             'server_hostname': secrets["broker"]}

# When using the sslparams below, a connection can be made to HiveMQ Cloud, but it's not secure
sslparams = {'server_hostname': secrets["broker"]}

mqtt_client = MQTTClient(client_id="picow",
                    server=secrets["broker"],
                    port=secrets["port"],
                    user=secrets["mqtt_username"],
                    password=secrets["mqtt_key"],
                    keepalive=3600,
                    ssl=True,
                    ssl_params=sslparams)
mqtt_client.connect()
print('Connected to MQTT Broker: ' + secrets["broker"])

# Send a test message to HiveMQ
mqtt_client.publish('test', 'HelloWorld')

# Continuously measure the distance and send the value to HiveMQ
# Based on https://randomnerdtutorials.com/micropython-hc-sr04-ultrasonic-esp32-esp8266/
hcsr04 = HCSR04(trigger_pin=17, echo_pin=16, echo_timeout_us=10000)
print("Starting the distance measurement")
killed = False
while not killed:
    # Measure distance
    distance = 0
    try:
        distance = hcsr04.distance_cm()
    except Exception as e:
        print("Distance measurement failure\n", e)

    # Send to HiveMQ Cloud
    try:
        json = "{\"value\": " + str(distance) + "}"
        print("\tMessage for queue: " + json)
        mqtt_client.publish("picow/distance", json)
    except Exception as e:
        print("\tMQTT publish Failed, retrying\n", e)
        killed = True
        continue

    # Sleep a second
    time.sleep(1)
When executing the above code with the “Run current script” button in Thonny, you should get the following output that shows the device connected to Wi-Fi and started sending data.
>>> %Run -c $EDITOR_CONTENT
----------------------------------------------------------------------------------------------
Connecting to AP: ***
Connected on attempt: 1
WiFi status: ('172.16.1.88', '255.255.255.0', '172.16.1.1', '172.16.1.1')
----------------------------------------------------------------------------------------------
Connecting to NTP
Current time: (2022, 9, 29, 16, 2, 20, 3, 272)
----------------------------------------------------------------------------------------------
Loading CA Certificate
Obtained CA Certificate
----------------------------------------------------------------------------------------------
Connecting to ***.s1.eu.hivemq.cloud as user picow-user
Connected to MQTT Broker: ***.s1.eu.hivemq.cloud
Starting the distance measurement
	Message for queue: {"value": 108.6254}
	Message for queue: {"value": 107.732}
	Message for queue: {"value": 14.10653}
	Message for queue: {"value": 16.95876}
Conclusion
HiveMQ Cloud requires a TLS (secure) connection which is a bit challenging for this kind of small boards. But still, a connection can be set up easily and from then on the possibilities are endless, even for a small board of 6$.


