PiJava - Part 4 - Building a minimal JavaFX 11 application with Maven
I prefer a Java app above a web app, because starting a new “modern” web development requires you to pull a bunch of dependencies and a lot of files before you can start. While Java just needs the JDK and one Java file, even on a Raspberry PI (as described in PiJava - Part 2).
Starting a new web project is very well visualized by Garabato Kid:
But building a JavaFX as a single file which you can run on multiple platforms, requires some more steps. In this tutorial we will build a .jar which can run on any device which has the Java runtime and JavaFX modules installed. I have most experience with Maven to do this (Gradle is alternative), so I worked out a minimal example to do this for a JavaFX 11 application.
Step-by-step
Code editor
I’ve used IntelliJ IDEA to make this example, but you can also use Eclipse, Visual Studio Code (full documentation for Java in VSC here) or another IDE of your choice, but maybe you will need to install Maven (which is the build tool) next to it in that case.
The full source
You can find the full source here on GitHub to make this application:
POM file
A Maven project is defined by its pom.xml file. This XML file describes the project and how it should be packaged. There are a lot of optional settings you can define, but in this project a strict minimal file has been created, check it on GitHub for the full content. I’ve added a lot of comments to make sure it’s clear why each part was added.
My goal was to be able to build the application on a PC (for fast development and testing) and run the compiled .jar on a Raspberry PI.
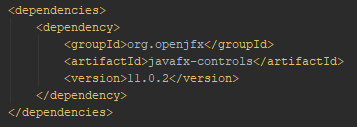
One important part in the pom is the dependency to the JavaFX controls library which is needed to build the demo app with some Labels and Buttons.
With additional build plugins which are defined in the pom, it is possible to
- run the application inside IntelliJ in two steps:
- compile the code with “compile:compile”
- start the application with “exec:java”
- package the app in a .jar so we can run it anywhere:
- package with “jar:jar”
- the jar can then be found in the “out” directory.
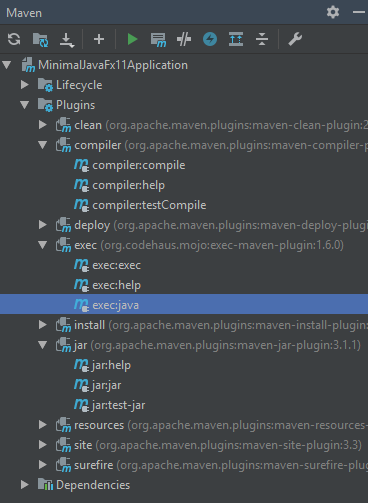
IntelliJ IDEA has a Maven Tool Window which provides you shortcuts to these Maven commands:
Source code
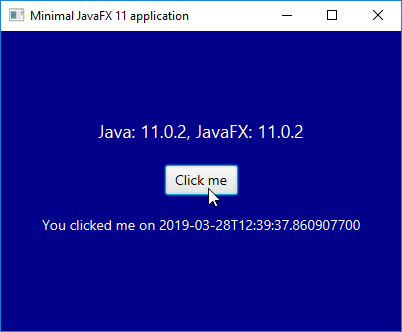
JavaFX demo screen
We start with an example JavaFX VBox with some Labels and a Button, so just some basic demo functionality.
import java.time.LocalDateTime;
import javafx.geometry.Insets;
import javafx.geometry.Pos;
import javafx.scene.control.Button;
import javafx.scene.control.Label;
import javafx.scene.layout.VBox;

public class JavaFXExample {
    // We need a private variable so we can change the text on a click on the button.
    private static Label clicked;

    public static VBox getHolder() {
        // Requesting the Java versions used by the application
        final String versionJava = System.getProperty("java.version");
        final String versionJavaFX = System.getProperty("javafx.version");

        // Show Java versions in a label
        Label versions = new Label("Java: " + versionJava + ", JavaFX: " + versionJavaFX);
        versions.setStyle("-fx-text-fill: white; -fx-font-size: 18px;");

        // Text label in which a text will be displayed when you click on the button
        clicked = new Label();
        clicked.setStyle("-fx-text-fill: white; -fx-font-size: 14px;");

        // Button to have some interaction
        Button button = new Button("Click me");
        button.setStyle("-fx-text-fill: black; -fx-font-size: 14px;");
        button.setOnAction(e -> clicked.setText("You clicked me on " + LocalDateTime.now().toString()));

        // Holder to align the items vertically
        VBox holder = new VBox(versions, button, clicked);
        holder.setSpacing(20);
        holder.setPadding(new Insets(0, 20, 10, 20));
        holder.setAlignment(Pos.CENTER);
        holder.setStyle("-fx-background-color: darkblue");

        return holder;
    }
}
Main
The Main class is called as the starting point of a Java application. We make it an extend of javafx.application so it will start the scene when we run the application from our IDE.
import javafx.application.Application;
import javafx.scene.Scene;
import javafx.stage.Stage;

public class Main extends Application {
    @Override
    public void start(Stage stage) {
        // The scene which is the "root" of our application
        Scene scene = new Scene(JavaFXExample.getHolder(), 400, 300);

        // The top level JavaJX container
        stage.setTitle("Minimal JavaFX 11 application");
        stage.setScene(scene);
        stage.show();
    }

    public static void main(String[] args) {
        launch();
    }
}
Launcher
An additional Launcher class is needed if we start the JavaFX application from the .jar file.
public class Launcher {
    public static void main(String[] args) {
        Main.main(args);
    }
}
Start the .jar on Windows
Before we can start the application as a jar, we need two downloads:
- The Java SKD or runtime, but as we are developing in Java I assume you have this installed.
- JavaFX 11 which you can download from GluonHQ. I unzipped it next to my Java SDK in “C:\Program Files\Java”
To start the .jar we need to provide the additional module path to the JavaFX location.
{LOCATION JAVA 11 executable} -module-path {LOCATION JAVAFX 11 LIB} --add-modules=javafx.controls -jar {LOCATION JAR}
You can find a ready to use bash script here which you probably will need to adapt to match the locations on your PC. Or open a command box or terminal where your .jar file is locate and execute the following command, again adjusted to use the locations as they match your PC:
"c:\Program Files\Java\jdk-11.0.2\bin\java.exe" ^
       --module-path "c:\Program Files\Java\javafx-sdk-11.0.2\lib" ^
       --add-modules=javafx.controls ^
       -jar MinimalJavaFx11Application-0.1-SNAPSHOT.jar
Conclusion
OK this has become a pretty large blog, but take a look at the sources itself and you’ll see the code and pom file are pretty small and self explaining and/or documented.
Next step: run this .jar file on a PI…