Example Java Application with Embedded Jetty and a htmx Website
I was experimenting with a Java application that can act as a web server and includes the user interface HTML-files that get modified with htmx, to replace certain parts of the HTML with other ones created in Java. I found it pretty hard to understand how to configure the embedded Jetty webserver, but as always with Java libraries, it’s pretty easy once you understand how to do it ;-) I decided to share my example, so you don’t need to go through the same search if you want to use the same approach…
For this experiment, I was inspired by the book “Modern frontends with htmx” written by Wim Deblauwe. You can read my review of that book here.
What is (Eclipse) Jetty?
As described on eclipse.dev/jetty: “Jetty provides a web server and servlet container, additionally providing support for HTTP/2, WebSocket, OSGi, JMX, JNDI, JAAS and many other integrations. These components are open source and are freely available for commercial use and distribution.”
Jetty can be run as a stand-alone webserver, or integrated in a Java application. The integrated approach is what I wanted to use and is described here.
What is htmx?
As described on htmx.org: “htmx gives you access to AJAX, CSS Transitions, WebSockets and Server Sent Events directly in HTML, using attributes, so you can build modern user interfaces with the simplicity and power of hypertext”
It’s a JavaScript library you add to your website, that allows you to “swap” HTML elements with other HTML provided by the server. It uses a different approach compared to most JavaScript frameworks that load JSON from an API and generate HTML on the client side. With htmx, you get fully formatted HTML back from the server and add it to your webpage, or replace other elements.
The htmx website gives this minimal example for a webpage with the action: “When a user clicks on this button, issue an AJAX request to /clicked, and replace the entire button with the HTML response”:
<script src="https://unpkg.com/htmx.org@1.9.11"></script>
<!-- have a button POST a click via AJAX -->
<button hx-post="/clicked" hx-swap="outerHTML">
    Click Me
</button>
Example Application
The sources of this example application are available on GitHub. It’s a Maven project that will provide two HTML pages, one with “simple” htmx, and one using a websocket.
Dependencies
Many of the Jetty+WebSocket examples that you can find online, refer to the javax-libraries for WebSocket integration. But after some searching, I found the correct configuration using the newer jakarta replacement library to achieve this. Although my example project uses Maven, I list the dependencies here in Gradle format, as that’s a shorter way to list them in a blog post :-)
Datafaker is used to generate “Lorum ipsum” text, so you’ll probably don’t need this in your project. And when you are not using WebSockets, you can remove two more dependencies…
org.eclipse.jetty:jetty-server:12.0.5
org.eclipse.jetty:jetty-slf4j-impl:12.0.5
org.eclipse.jetty.ee10.websocket:jetty-ee10-websocket-jakarta-server:12.0.5
jakarta.websocket:jakarta.websocket-api:2.1.1
net.datafaker:datafaker:2.1.0
Jetty Configuration
As I wanted to expose three different things on the same port, I needed some researching to combine them all into one Jetty Server instance:
- Static files (html, css, image,…) from the resources inside the JAR
- REST API endpoints
- WebSocket
The resulting constructor looks like this, using a ContextHandlerCollection to add the different handlers:
public class MyWebServer implements Runnable {

    private final Server server;

    public MyWebServer(int port) {
        server = new Server();

        try {
            ServerConnector connector = new ServerConnector(server);
            connector.setPort(port);
            server.addConnector(connector);

            ContextHandlerCollection contextHandlerCollection = new ContextHandlerCollection();
            server.setHandler(contextHandlerCollection);

            addResourceHandler(contextHandlerCollection);
            addRestHandler(contextHandlerCollection);
            addWebSocketHandler(contextHandlerCollection);
        } catch (Exception e) {
            System.err.println("Problem initializing the Jetty server: " + e.getMessage());
        }
    }
}
Resource Handler
The resource handler, makes all the files inside the resources/web directory accessible through HTTP with the following configuration:
private void addResourceHandler(ContextHandlerCollection contextHandlerCollection) throws Exception {
    URL url = MyWebServer.class.getClassLoader().getResource("web");

    if (url == null) {
        throw new Exception("Could not find the web files");
    }

    ResourceFactory.Closeable resourceFactory = ResourceFactory.closeable();
    Resource resource = resourceFactory.newResource(url.toExternalForm());

    ResourceHandler resourceHandler = new ResourceHandler();
    resourceHandler.setBaseResource(resource);

    ContextHandler contactHandler = new ContextHandler();
    contactHandler.setContextPath("/");
    contactHandler.setBaseResourceAsPath(Paths.get(url.toURI()));
    contactHandler.setHandler(resourceHandler);

    contextHandlerCollection.addHandler(contactHandler);
}
Rest Handler
Classes that extend HttpServlet are exposed via the rest handler. With this configuration, they can be reached on /rest/list and /rest/text:
private void addRestHandler(ContextHandlerCollection contextHandlerCollection) {
    ServletContextHandler apiHandler = new ServletContextHandler(ServletContextHandler.SESSIONS);
    apiHandler.setContextPath("/rest");
    contextHandlerCollection.addHandler(apiHandler);
    apiHandler.addServlet(ListService.class, "/list");
    apiHandler.addServlet(TextService.class, "/text");
}
WebSocket Handler
For the WebSocket part, two parts are needed. First, we need to create the endpoint like this:
@ClientEndpoint
@ServerEndpoint(value = "/ws")
public class MyEventSocket {


    @OnOpen
    public void onWebSocketConnect(Session session) {
        System.out.println("Socket connected: " + session);
    }

    @OnMessage
    public void onWebSocketText(Session session, String message) {
        System.out.println("Received: " + message);
    }

    @OnClose
    public void onWebSocketClose(CloseReason reason) {
        System.out.println("Socket closed: " + reason);
    }

    @OnError
    public void onWebSocketError(Throwable cause) {
        System.err.println("Websocket error: " + cause.getMessage());
    }

    public void awaitClosure() throws InterruptedException {
        System.out.println("Awaiting closure");
    }
}
Then this endpoint can be used in the WebSocket handler:
private void addWebSocketHandler(ContextHandlerCollection contextHandlerCollection) {
    ServletContextHandler webserviceContextHandler = new ServletContextHandler(ServletContextHandler.SESSIONS);
    webserviceContextHandler.setContextPath("/websocket");
    contextHandlerCollection.addHandler(webserviceContextHandler);
    JakartaWebSocketServletContainerInitializer.configure(webserviceContextHandler, (servletContext, websocketContainer) -> {
        websocketContainer.setDefaultMaxTextMessageBufferSize(1024);
        websocketContainer.addEndpoint(MyEventSocket.class);
    });
}
I use the Firefox plugin “Simple WebSocket Client” to test WebSocket communication to make sure it works, before diving into the HTML client implementation… As you can see in the screenshot, the server sends a timestamp every second and answers when you send a message starting with “echo”.

htmx web requests
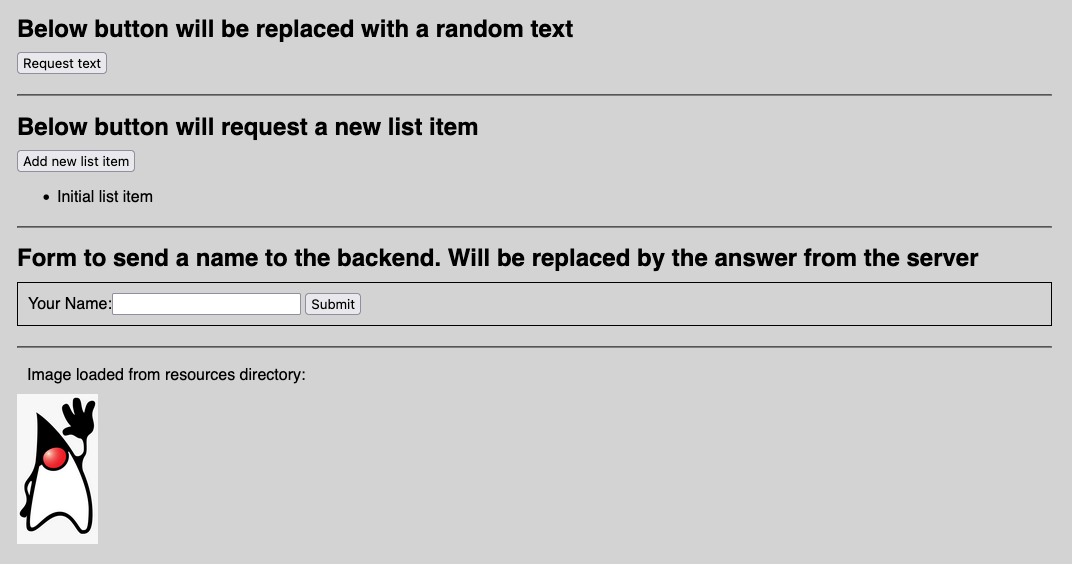
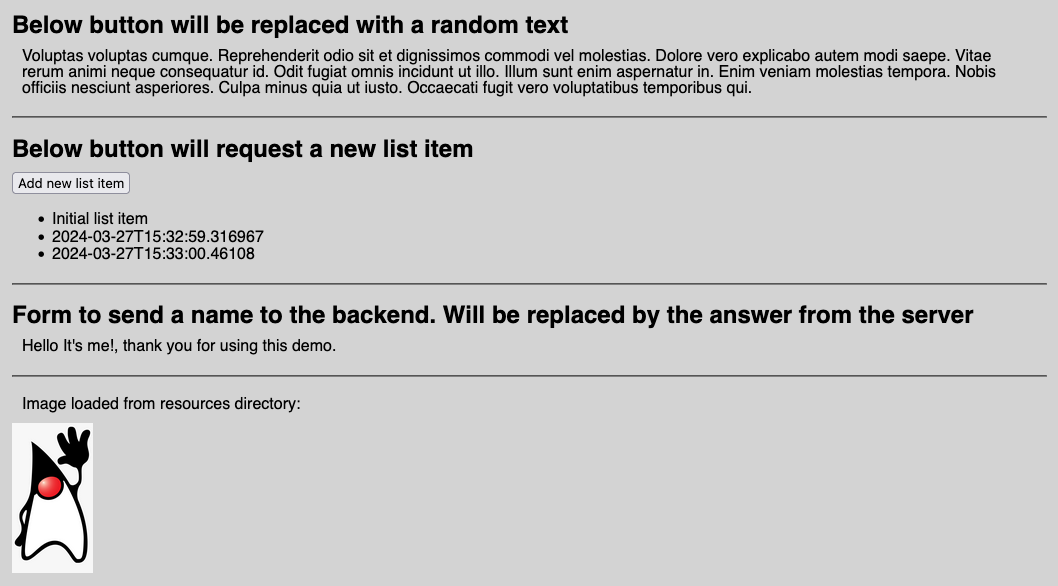
The example application contains two test pages. The first one, available on http://localhost:9999/index.html contains a few small examples of how you can use htmx to request data from the server and handle it on the client side. These example shows a button that calls the API on /rest/text to get a random paragraph (<p>) which replace the button because of the hx-swap="outerHTML":
<button hx-get="/rest/text" hx-swap="outerHTML">
    Request text
</button>
Another demo requests a list item (<li>) with a timestamp from the API on /rest/list and adds it to the end of the already existing list because of the hx-swap="beforeend" hx-target="#list":
<button hx-get="/rest/list" hx-swap="beforeend" hx-target="#list">
    Add new list item
</button>
<ul id="list">
    <li>Initial list item</li>
</ul>
htmx with websocket
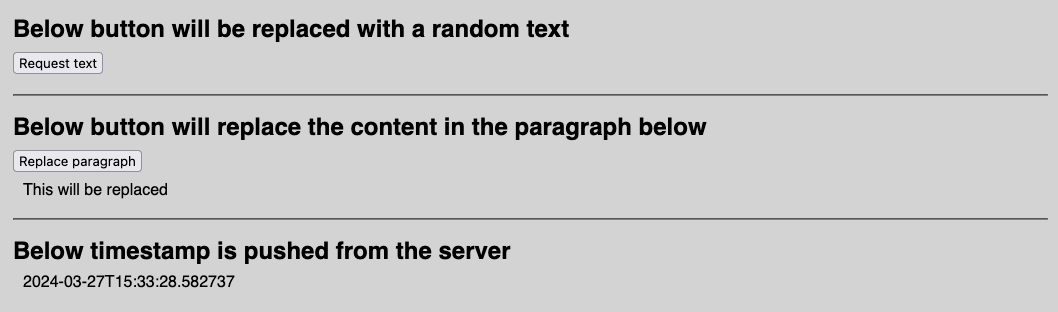
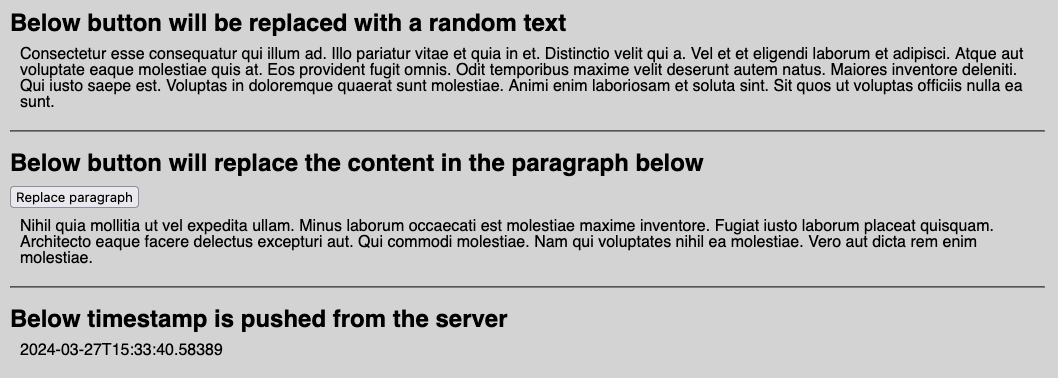
htmx makes it also very easy to communicate between client and server with WebSockets. You need an additional JavaScript include and some small configuration in the body as you can see in the sources of the page that is available on http://localhost:9999/websocket.html:
<body hx-ext="ws" ws-connect="/websocket/ws">
By adding ws-send in any HTML-element, you instruct htmx to replace it’s default behavior with a call through the WebSocket. The following example is identical to the button described before, but is now handled in MyEventSocket.onWebSocketText instead of the API used before.
<h2>Below button will be replaced with a random text</h2>

<button hx-swap="outerHTML" id="replaceThis" ws-send>
    Request text
</button>
In MyEventSocket a scheduleAtFixedRate is implemented to send a timestamp from the server back to the client every second so it can display it’s still connected.
Running the Application
You can start the application from your IDE, or build it first as a JAR.
In IntelliJIDEA
- Open the project in your IDE as Maven project.
- Open
be.webtechie.javajettyhtmx.Application. - Click on run on the
mainmethod. - Open the browser on one of these pages:
- http://localhost:9999/index.html
- http://localhost:9999/websocket.html
- Test the REST APIs:
- http://localhost:9999/rest/text
- http://localhost:9999/rest/list
- You can test the WebSocket on this endpoint:
ws://localhost:9999/websocket/ws
From JAR
- Build the application with
mvn package. - Start it with
java -jar jetty-htmx-demo.jar
Conclusion
Any technology, library, or framework should be evaluated to be sure it’s the right solution for the problem you need to solve. But I’m sure the combination of Jetty and htmx can be used in many cases where you have a web user interface where elements need to be modified or swapped with other ones that can be generated perfectly as formatted HTML on the server. This way you can keep all the business logic and data handling in one point which is, in my opinion, the Java code.